
Storing Christmas ornaments
[Note that this post contains some affiliate links. This means that if you were to make a purchase on Amazon using one of those links, I would get a tiny commission, at no extra cost to you. The hard-sided bin I recommend is one I own and paid for myself; the tree bag is the one I would buy if I had to part with my current model, which is no longer being made.]
Here is how I store Christmas ornaments to make things easier on myself when I put up the tree the following year. Really, a lot of organizing is about making things easier for Future-You! (You can also check out my recommendations on how to store your gift wrapping supplies.)
First, make sure to donate any ornaments you no longer love, and discard those that are damaged.
Tree ornaments
I use a hard-sided storage box like this one, though some soft-sided boxes (like this small one or that larger one) look great, too. I especially love the cardboard dividers inside, which keep your ornaments secure and tidy! They also help set a limit as to how much stuff you can keep – if you are getting those boxes for the first time, make sure you have decluttered your decorations and then buy a box (or more) with enough compartments for your collection.


Resist the temptation to cover things in layers of tissue paper. You run the risk of tossing out ornaments because you can’t see them and assume it’s just a wad of paper! You can always create a nest of tissue paper in a cardboard compartment for something especially fragile, or get a special box for it, but make sure you can still see everything. Another idea would be to store the small fragile ornament in colored tissue paper to make sure it stands out.
To take things one step further, here’s what I recommend: put all the smallest ornaments on the bottom layer in the box. Those are the last ornaments that you’ll be putting in your Christmas tree, so it makes sense for them to be the last ornaments you’ll unpack from that box! You can put the other layers on a flat surface in the meantime and fill them, then transfer them back to the box when you’re ready. I’ve added a jar of extra hooks in one slot.
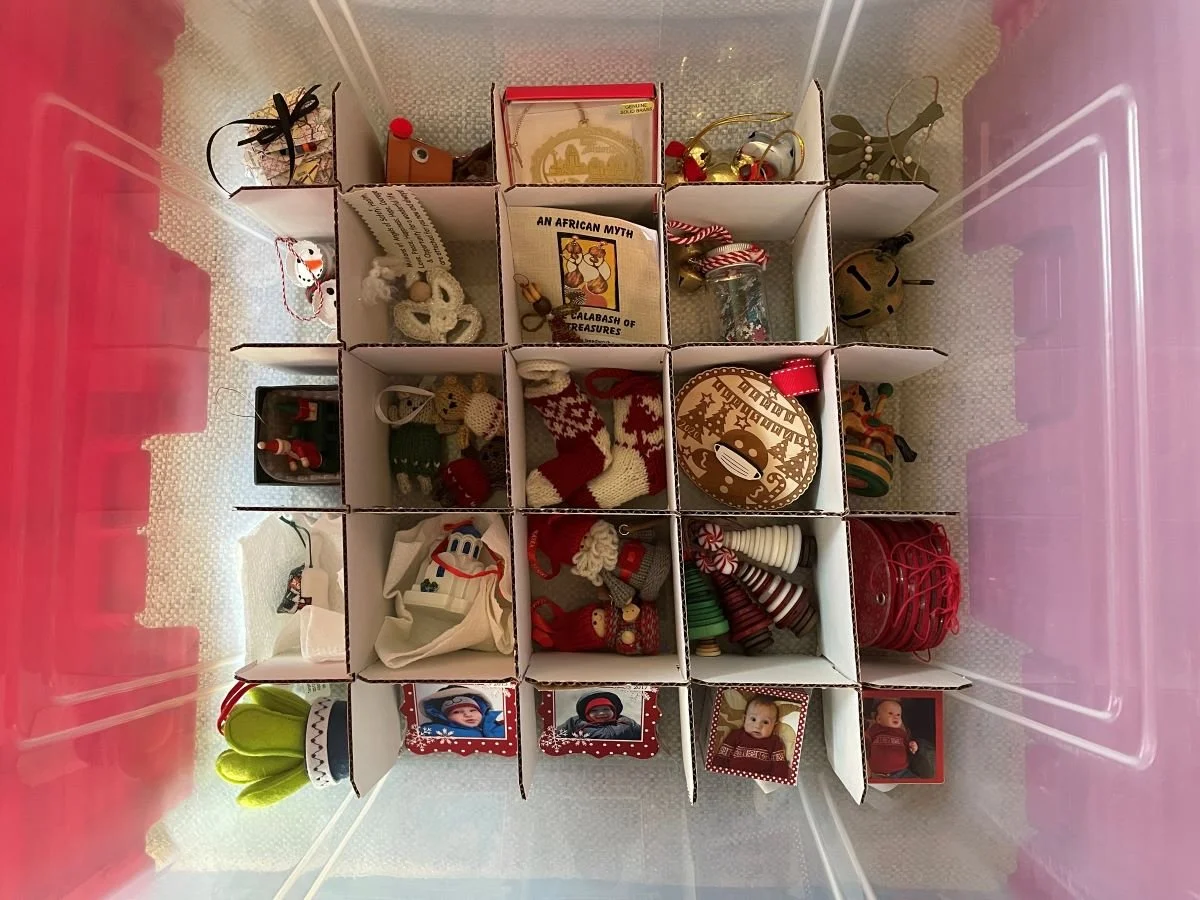

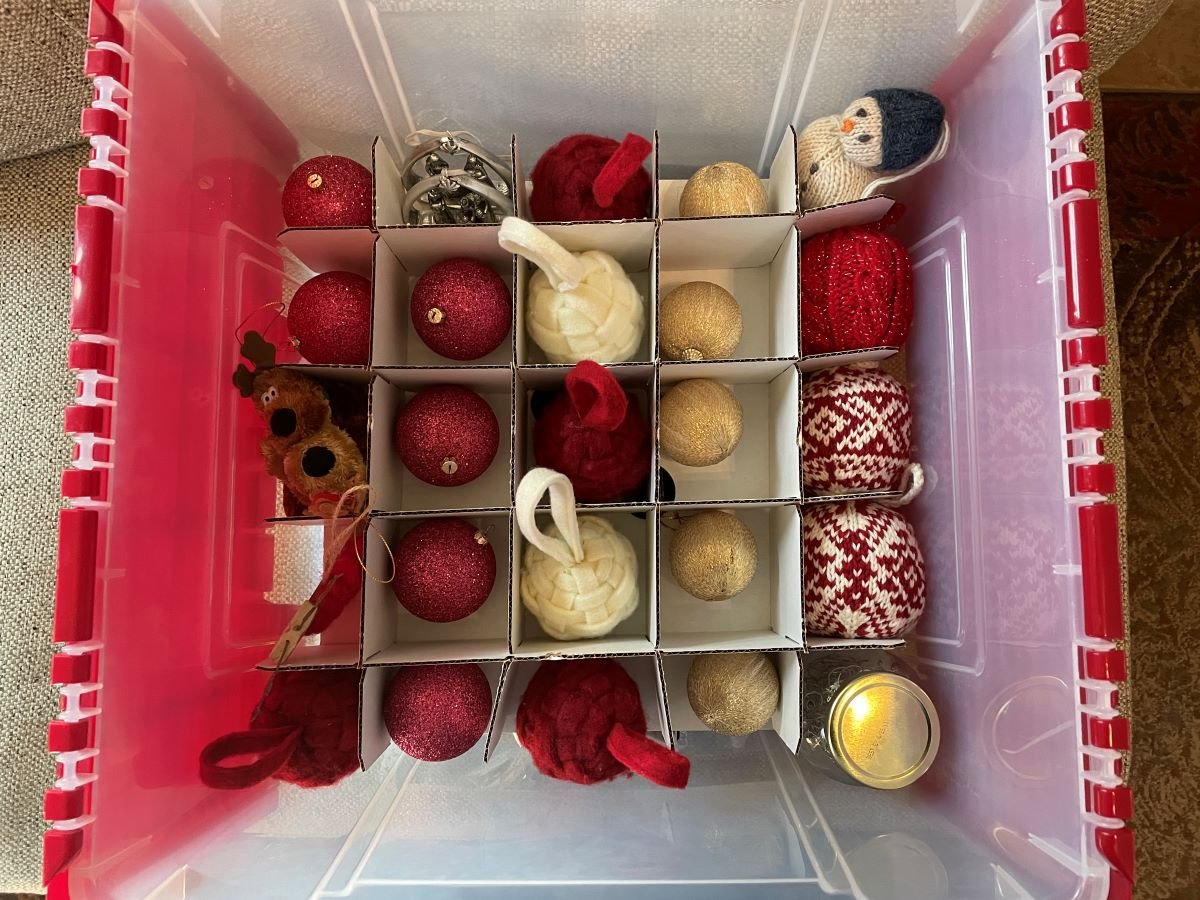
When there are a lot of the same series of very small ornaments, I put them together in a clear plastic bag so that they are visible and are stored together.

I also wrap garlands around a piece of cardboard, which keeps them tangle-free until the following year.


Another idea is to use velcro straps to wrangle garlands or strings of lights if you prefer that to cardboard.

Artificial trees and wreaths
As for storing an artificial Christmas tree, I’m a big fan of sturdy bags like this. The large handles and wheels make it easier to carry. It’s water-resistant and will help protect the tree from dust and critters. Just make sure you take the tree apart (it’s often in three sections), fold back the branches to prevent them from getting bent, and store them in the bag, biggest on the bottom, with the pole end toward the middle. This also helps keep the tree and its accessories contained in one spot. Ideally, you’ll want to store it someplace that doesn’t get too hot or too cold (so, not the attic or garage), especially if it has white limbs or fake snow, though this isn’t much of an issue with green trees. The same is true with artificial wreaths, for which you should get a container of the appropriate size.
Let me know if you have any decorations that I have not addressed here!
Gift Wrap Storage
This post contains one or two affiliate links with Amazon, which means that if you make a purchase using that link, I’d receive a small commission, at no cost to you. I do not have such a deal with The Container Store, though if you hire me to shop with you, I can get you my organizer discount on your purchase!
A common pain point, especially around Christmas, is how to store gift wrapping supplies. I’ve even met one person who is so unsure of how to deal with it that she actually throws everything away after Christmas and just buys new supplies every December. That’s certainly one way to deal with it, but let me help you be more efficient!
Declutter
The first step is to declutter what you own. I’m the type of person who always saves supplies if they are still in good condition, but I do get rid of those that are torn or wrinkled. I’ve also added a few reusable supplies, like furoshiki (squares of fabric) and cloth ribbon for wrapping gifts, alongside the usual disposable or recyclable supplies.
If you are trying to streamline what you own, consider creating a capsule of sorts. For example, if you were to buy plain red paper, you could use it for Christmas and Valentine’s Day as well as birthdays! You can also pick only wrapping paper that contains at least *some* red, and then as long as you have red ribbon and red gift tags, you’re all set! Limiting the colors of your supplies actually make them more versatile.
Store
As for storage, if you are low on space and/or budget, the easiest solution is to use a hanging garment bag for wrapping paper and perhaps a pants hanger for ribbon, as below. You might even have those supplies on hand already! If you have a lot of rolls of paper, consider subdividing them, such as one bag for Christmas and one bag for birthdays.


If you like this idea and want something that is more specialized, I recommend this hanging two-sided storage caddy. I love that it has space for bags and gift tags, and you could even store premade bows safely.

Another good way to store gift wrapping supplies is in a tote under your bed. You can opt for a canvas tote or a plastic one. Both allow you to store all your supplies in one spot, though I have a slight preference for the nesting boxes in the plastic tote, which will protect bows more adequately and help you keep accessories in their designated space.

Another solution that doesn’t take up too much space is an over-the-door rack like this Elfa version, below. It fits behind most closet doors, and Elfa systems are highly customizable to your needs.
Finally, if space and budget are not an issue, let me introduce you to the Cadillac of storage solutions: the Elfa Gift Wrap Cart below! I bought mine about 20 years ago and it’s still as good as new! I believe the price was lower back then, but I recommend that you wait for an Elfa sale before buying it. I haven’t labeled the drawers (because I’m basically the only member of my household who uses it), but the top one is for gift tags and scotch tape; the second one is ribbon; then tissue paper, bags, and boxes. And rolls of wrapping paper on the side. Wrapping gifts is such a joy when you’ve got a place for everything!

Keeping counters clear
I am going to be brutally honest and vulnerable here… My kitchen counter was a mess. Not the whole counter, mind you, just the part of it that was on the edge between the kitchen and the living area, right next to the pantry. But things had begun piling up, and the law of entropy kicked in – once things start piling up, the pile attracts more and more things. It’s just physics. It goes beyond “flat surfaces are clutter magnets” because once the first few items have been set down, your brain unconsciously sees it as an invitation to just put more stuff there (one or two more things won’t matter, right?), and then it’s a complete mess.

So when I absolutely couldn’t stand it anymore, I did the only reasonable thing: I took myself on as a client. Meaning, I stopped just letting this pain point exist, I detached myself from the situation, and I looked at it the same way I would look at a client’s kitchen to come up with a solution. Here’s my process.
1- What types of items are on this counter?
Figuring out what types of items make up the clutter is crucial to figuring out how to stop them from piling up! In this case, I had two big categories: electronics (that spot is where we put the tablets and chargers because it’s super convenient) and pantry overflow (things that had not been put away in the pantry properly). The pantry overflow started because I had a big canister that I meant to replace with a smaller one, but I procrastinated and left it out on the counter. Clutter is just unmade decisions, right? And from that moment onward, various items that belonged in the pantry just settled down to live on the counter with the big canister – either they didn’t make it back into the pantry after being used, or they were not put away with the rest of the groceries.
2- Figure out a solution for those types of items!
Alright, the electronics are there to stay, so let’s make it work. I went to The Container Store and looked at a bunch of trays and shallow bins before settling on a water hyacinth basket that looked good to me. Now, the tablets and chargers live in that basket. This works because not only do things stay corralled in there, but they also visually come across as having been put away where they belong rather than left out on a countertop.
As for the pantry overflow, I finally got that smaller canister that fits in the pantry. A few items were consumed as intended, some were returned where they belong, and I made a larger spot in the pantry for backstock to help prevent this situation.


3- Evaluate the solution
To prove my point that clutter attracts clutter, I didn’t tell my family members what I was doing, nor did I give them specific instructions for maintenance. They liked the basket and instinctively understood that electronics go in there. Because there was no clutter on the counter, things no longer piled up there unnoticed. After two weeks, I took another picture to show how it’s going. Two extra things made their way back: one is my husband’s glass of water, which he just always puts down in that spot, and that’s fine. The other is a bottle of supplements to stir in water for one of our kids – it’s just way more practical to have it there instead of in the dining room with the other supplements, so that’s where it lives now. And that’s it!

4- Tweak as needed
Things change in our life – right now we’re in a season where we use those supplements, but eventually we won’t need them anymore. Maybe it’ll be something else left out on the counter instead, and we’ll have to tweak the system to suit our situation at that point. Or maybe I would have needed to reevaluate the solutions I came up with if they had not been working well for us – that happens, and it’s normal. But I think we’ve got it handled for now!
Worthwhile travel accessories
[This post contains affiliate links. This means that if you use my link to make a purchase, I get a very small commission, at no extra cost to you. I only recommend items that I own myself and that I am glad I bought!]
Packing
I recently went on a trip to Europe with my family, so I had the opportunity to test some new travel gear, and I decided to share what I found useful. First, as I said in a previous blog post, I wholeheartedly stand by my dual-sided compression packing cubes. Not only do they help keep everything organized in my suitcase, they also help clothes take up a bit less space! I actually tried compression bags (the kind that have a one-way valve so that you can roll them up and expel air from them), but the cubes are definitely my favorite. They accomplish the same thing, but have the advantage of looking good and being much more practical in both open and closed states, so I’m sticking with them. I slip an AirTag in each suitcase, which gives me peace of mind by letting me track my belongings. I also like using TSA-approved combination locks, which make my life easier because I don’t have to also keep track of a key. Pro tip: Use the same code for all your locks.

The easiest way to travel light is to bring fewer clothes than you need for the trip and do laundry on the go. I love having my laundry travel kit for just this purpose! It also comes in handy if I (or one of my kids) get a stain and we need to treat it as soon as possible, before the trip is over.

Toiletries
As for toiletries, anything that comes in a gel form (moisturizer, shampoo and conditioner, hair lotion, etc.) goes into Go Toob + silicone bottles, which have a wide mouth that makes filling them (and cleaning them) easy. Meanwhile, true liquids (like mouthwash) go in Nalgene bottles. Both of these are completely leak-proof, and I am particularly happy to have found those Nalgene bottles – everything I had tried previously for mouthwash had leaked, but these are perfect! I then put my toiletries and personal care items in my Bagsmart toiletry bag, which has convenient clear compartments, multiple zippers, and is easy to hang behind a door.


Purse
I needed a cross-body bag big enough to carry my essentials (like a purse but also for travel items like water, sunscreen, passports, etc.); however, it had to be small enough that I could take it with me into museums and churches, where backpacks or large purses are not allowed. So I bought this medium-sized Travelon anti-theft cross-body bag and loved it! It was absolutely perfect for my needs, and I even had extra room in there for a few souvenirs. It doubled as my personal item on the plane. It was very useful during this trip and a great investment for future ones! I also got an RFID card holder so that I could carry an ID card, a few credit cards, and some cash, without the bulk of the rest of my wallet.


Children’s safety
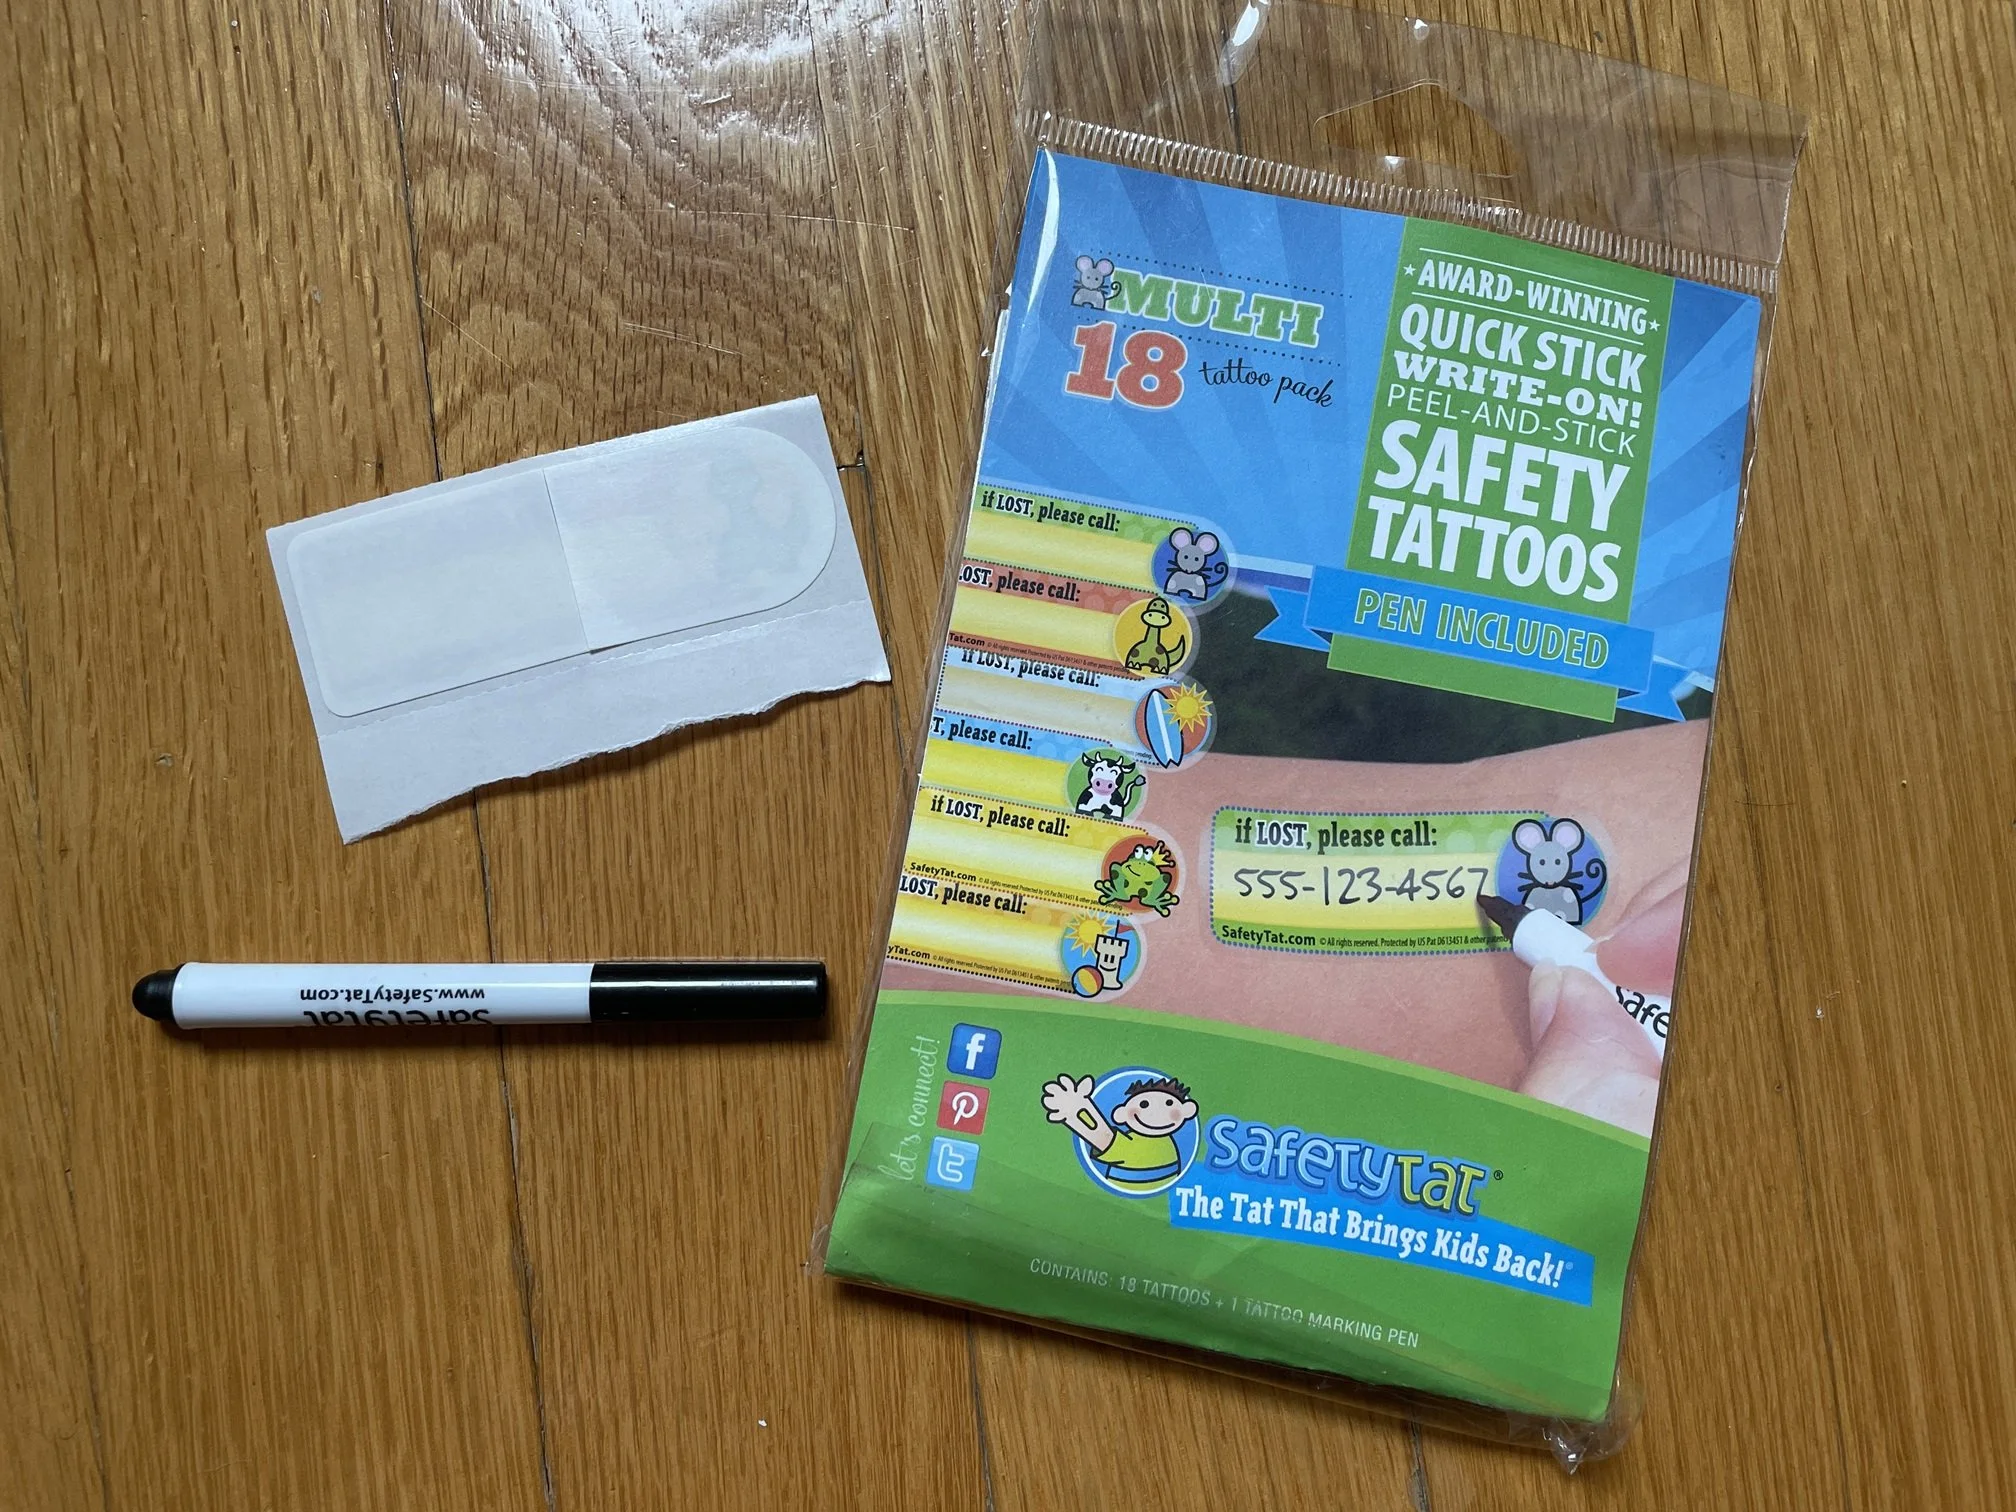
Finally, if you have children older than 4 and want to keep them safe in vehicles, get a MiFold seat. This ingenious device folds up very small, and helps adjust a vehicle’s seatbelt to be safe for smaller kids, so that you don’t have to worry in a rental car or cab. I’ve used them for the past 6 years and absolutely love them! This time around, I also tested out SafetyTats, which I actually used on my kids’ clothing instead of on their skin. It allows me to write down a phone number when I can be reached in case we ever got separated, and the adhesive worked incredibly well – I could remove it from one shirt and apply it to another for a whole week!

The ongoing cost of ownership
Sometimes, people are reluctant to get rid of items they own because they paid a lot of money for them. I’m talking here about items that are no longer useful or loved or important, but are kept simply because the owner perceives them, rightly or not, as valuable. After all, why would you get rid of something if you paid a lot of money for it? Well, I can see that point, but… Have you ever thought about the ongoing cost of ownership?
First of all, an item takes up space. It doesn’t matter whether it’s a grand piano or a diamond ring, it takes up space in your home, and you pay for space. If it’s a piano, the amount of space is significant! Think about what else you could do with that space if the piano that you don’t use weren’t there. Could you turn that room into a dining room? A home office? A reading nook? Do you have so many unused large items that you are essentially paying rent or a mortgage for a room you don’t need? Are you getting your money’s worth from your space?

This photo was taken by Geert Pieters for Unsplash.
Plus, any object needs to be managed. You have to clean it, clean around or under it, maintain it, repair it, insure it, pick it up and put it away… It costs you time and energy, in addition to mental bandwidth! Managing this item will cost you, and you need to make sure that the cost is worth it in this season of your life.
Then it comes down to the sunk cost fallacy. When we have invested heavily in an item (because we paid a lot of money for it, because we believe that someday we will use up all those scrapbooking supplies, etc.), we are reluctant to let it go, even when we know that letting it go would be more beneficial than keeping it.

This photo was taken by Volodymyr Proskurovskyi for Unsplash.
There are two quotes on this topic that I’d like to share, and I say variations of these things to my clients often. First, Peter Walsh wants us to keep in mind that just as “inexpensive is not a good reason to buy something, expensive is not a good reason to keep something.” Also, Cassandra Aarssen says, “Remember that the money you spent on your item is gone. You will not be richer because you store this item in your home, and you won’t be poorer if you let it go.”
An obvious solution, in those cases, is to sell the item. Or at least, it seems easy in theory, but is less so in practice. Ask yourself whether selling the object is really worth your time and effort. Will you post pictures of it online and field inquiries from people who might be interested, or pay to ship it to the buyer? Will you really have a yard sale or go to multiple consignment stores? Will you be satisfied with getting only a fraction of your money back after all that effort? If yes, then go for it!
Here’s another solution: look at the cost you already paid as a rental fee. You’ve gotten whatever use you were going to get out of this, and now it’s time to let it go. If you must try to sell it, give yourself a deadline after which you will just donate it. Move it along to its next owner, and your payment will be the peace this brings into your life. Besides, the money you spent on it is gone already, even if you were to keep the item! At least this way you get your life back.

This photo was taken by Fuu J for Unsplash.
The container concept
When you are trying to organize your space, it’s important to have a plan of attack. One of the most useful tools I share with my clients is the container concept, or having a space budget. In this blog post, I’ll explain what the container concept is, how it works, and why it’s essential for home organization.
The container concept: what is it?
Simply put, the container concept is the idea that every item in your home should have a designated spot, or “container”. I love organizer Peter Walsh’s famous quote, “Where is it going to live?” I try to keep it in mind whenever I acquire something. Whether that container is a physical bin or a shelf, drawer, or simply a place by the door, it’s important to assign a specific space to every item in your home. By doing so, you can keep your belongings organized and minimize clutter.

This photo was taken by Tatiana Syrikova for Pexels. Notice how this doesn’t look cluttered, because each object has been intentionally placed.
How it works
The container concept works by applying a few simple principles:
1 – Assess your space. Before you begin organizing, take a close look at the space you have available. Determine what areas need organization the most and how much storage you have to work with.
2 – Make a list of all the items you’ll be organizing. This will help you determine not only what can realistically fit in a designated space, but also what containers or storage solutions you’ll need.
3 – Designate a container. For each item on your list, designate a specific container or spot. This could be a shelf, a drawer, a bin, or any other type of storage solution.
4 – Stick to your space budget. This means that the amount of space you have available for each category of items is limited – if you exceed it, you end up with clutter. For example, you might allocate one drawer for all your socks, or one bookcase for all your books. By sticking to your “container” (the drawer or bookcase), your stuff is contained and can stay organized. If it exceeds those boundaries, that’s when it gets in your way and ends up being clutter – you’ll need to get rid of some items then. Sticking to the one-in-one-out rule makes this easier!
5 – Adapt as needed. The container concept can absolutely be flexible. If you find that a container isn’t working for a particular item, or that you actually need more (or less!) space for a category of items, don’t be afraid to adjust your organization plans.

This photo was taken by Kelly Sikkema for Unsplash. Markers and pens are corralled in this jar, so they are easy to find; it also serves as a visual reminder that there are enough pens and markers and no new ones need to be purchased.
Why it’s important
The container concept is an essential tool for home organization because it creates a structured system for your belongings. This approach prevents clutter by setting limits on how much space you have available for each category of items. By sticking to your space budget, you can avoid the temptation to accumulate more stuff than your home can handle. Moreover, by assigning a designated spot for everything, you can easily keep track of your belongings and find what you need quickly (not to mention, you now know exactly where to put it back). Apply the container concept in your home to experience the benefits of an organized space!